D.M., may his days be blessed, done the English translation of the “Inclined fire” series of articles (and that was the start of guns.ptosis.ch). He is too modest to claim proper credit, but without his help this site would not be. My gratitude is as deep as thorough.
This is 2020 version of the article — extended and simplified. As compared to the original, all conclusions stand, but the explanations are better.
TL/DR summary for the lazy ones
(If all of a sudden Zombie Apocalypse strikes, and you just don’t have time to read it all.)
1. NDS
| Accuracy: | bad |
| Domain: | up to ≃400-500 m |
| Complexity: | moderate — 1 table lookup, 2 mathematical operations |
| Pros: | none |
| Cons: | inelegant and useless |
| Conclusion: | Zombies would laugh their heads off |
| Accuracy: | acceptable |
| Domain: | 30º, < 500 m. Maybe a little more if holding a correction. |
| Complexity: | very simple — 1 table lookup, 1 mathematical operation, often automated |
| Pros: | beautiful simplicity, independence from rifle and calibre, no need to amend or extend existing ballistic tables |
| Cons: | surprisingly limited applicability |
| Conclusion: | Not far away zombies suffer |
| Accuracy: | good |
| Domain: | up to ±30º — all distances. Up to ±40º — within 800 m with additional hold |
| Complexity: | easy — 1 table lookup, 1 mathematical operation |
| Pros: | reasonable accuracy, simplicity, can use existing tables. |
| Cons: | depends on zero distance |
| Conclusion: | Zombies start getting really, really scared. |
| Accuracy: | A+! |
| Domain: | as far as the eye can see |
| Complexity: | complex! 2 table lookups, 3 mathematical operations |
| Pros: | accuracy is as good as it gets |
| Cons: | too complex to be useful in the field, requires extra data (regular ballistic tables are not enough) |
| Conclusion: | Zombies would have time to eat your ass off before you sort out the dope. |
5. World’s premiere — 2I2R (also for MOA turrets)
| Accuracy: | A |
| Domain: | all practical angles, distances, and calibres |
| Complexity: | easy — 1 table lookup, 1.5 mathematical operations |
| Pros: | accuracy, simplicity, can use existing ballistic tables |
| Cons: | only works with 100m / 100 yd zero; procedure depends on click value |
| Conclusion: | Zombies stand no chance |
Inclined Fire, part #1: Definitions
Before jumping into formulas it makes sense to get an intuitive understanding of forces at work. School-level knowledge of Newton’s laws of motion and basic trigonometry will suffice.
1.1 Bullet Trajectory (what is actually going on)

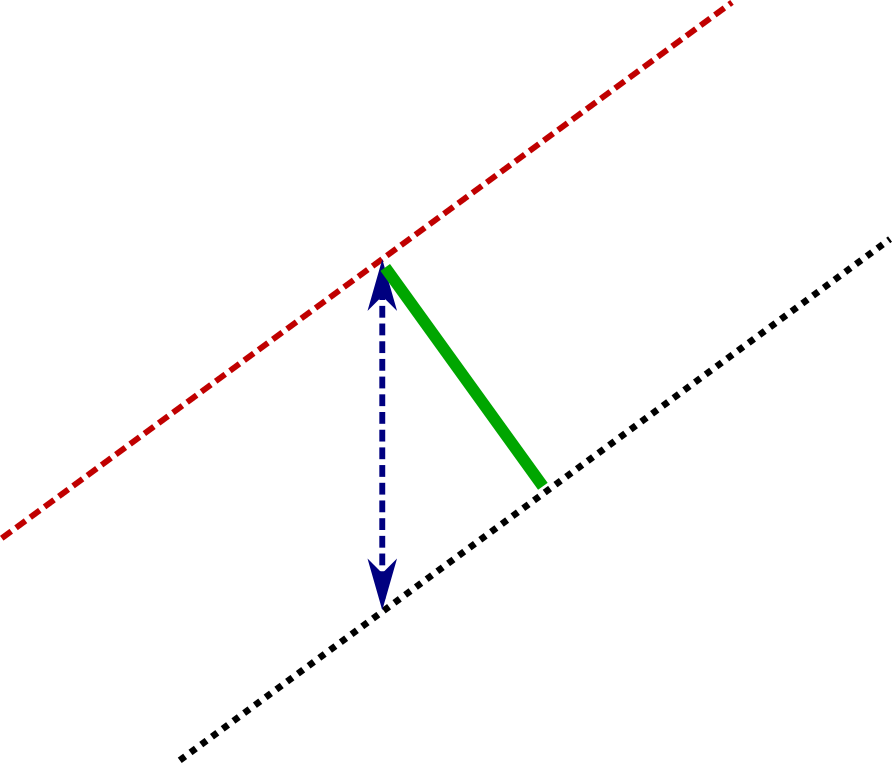
The black dashed line on the picture above shows trajectory of a .50 cal armor-piercing incendiary bullet. Red line of sight (LOS) goes straight from shooter’s eye to the target. We are primarily interested in distances between trajectory and LOS, because that’s what we’ll compensate with scope’s elevation turret.
Blue arrow shows vector of gravity acting on the bullet. By the time my favourite GP11 bullet reaches 800 meters, it drops 7 meters below line of sight (throughout this document I will assume 100 meter zero).
Here’s how things change when shooting at an upward angle:

Exact same gravity is still pulling down, but “down” is no longer “perpendicular to LOS”. Only one component of gravity is bending trajectory towards LOS, the perpendicular one. Which means that bullet flies higher than when shooting horizontally.
Side note: the other component does act to slow the bullet down, but given typical speed of modern rifle bullets the effect is barely noticeable.
Opposite scenario – this time we’re high on the hill, shooting down.

The logic is the same – only the perpendicular component of gravity is bending bullet trajectory towards LOS, therefore bullet flies higher than when shooting horizontally.
The drop (towards ground) is actually the same; it is just that we see it differently.

Replay: when shooting at an angle, no matter if it’s up or down, bullet goes higher than when shooting horizontally.
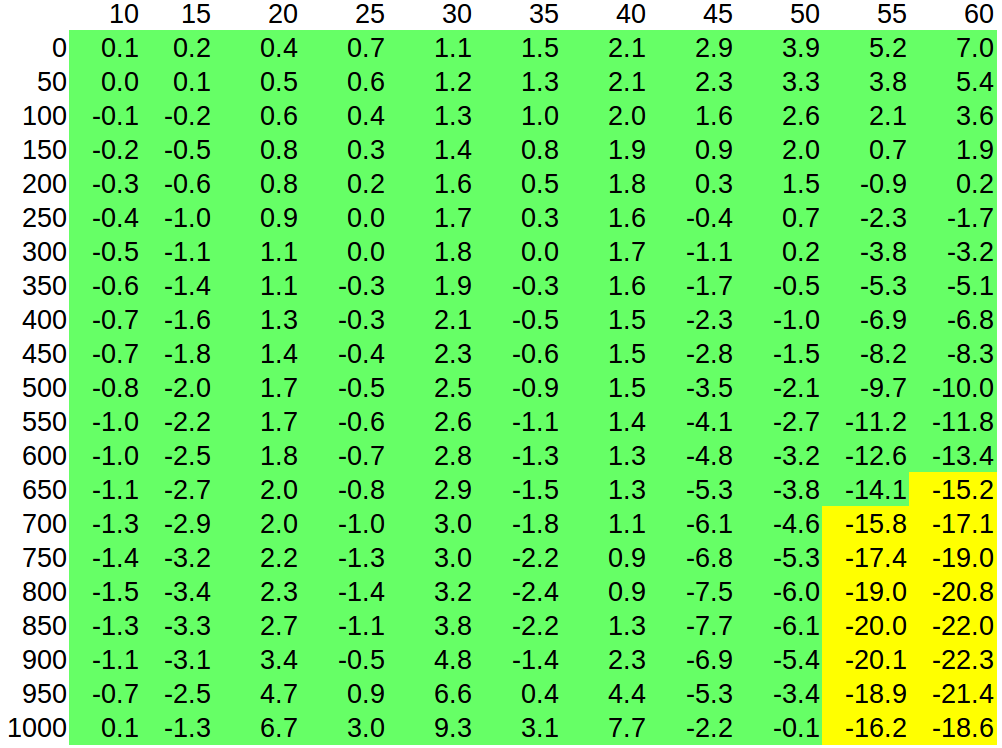
In practice, the correction to introduce (as compared to flat shooting) is essentially the same for a given line-of-sight angle, whether we are aiming up or down. When we shoot up, a part of the gravity force “works against” the bullet, but, compared to air resistance, the effect is rather marginal. This is further mitigated by the fact that air is less dense higher up (ex., when shooting at 1 km distance at 30° up, the target is 500 m higher than the shooter).
Given the same angle, depressed fire trajectory is slightly higher than elevated one, but usually there is less than 1 or 2 clicks difference, which can be ignored at most practical distances.
Example: K31+GP11, difference in 0.1 mrad clicks between shooting up and down at the same angle

(The picture is quite typical, but if you want certainty for your preferred rifle + cartridge, just ask a ballistic calculator.)
1.2 How much is 1 MIL
Let’s say your scope has MIL turrets (one click is 0.1 MIL), and you are asked “how much is 1 click at 500 m”. You’d be inclined to say “5 cm” – but that’s not the right answer, at least as far as inclined fire is concerned.
Let’s start with a simple horizontal example:

We changed our aim by a small angle r when shooting at distance D. (Picture is not to scale; in reality 0.1 MIL ≃ 0.00573 degrees.) Corresponding change in heigh would be
d = D * tan(r)
Remember SohCahToa? That’s toa, or Tangent = Opposite / Adjacent. For small angles r expressed in radians tan(r) ≃ r. For example, one click is 0.1 MIL, which is 0.0001 radians, and tan(0.0001) = 0.000100000000333… (very close to 0.0001).
So if r is in MILs, then d ≃ D * r / 1000.
Now back to our hills.

The whole thing is now rotated by angle α, which is much bigger than r and convenient
approximation no longer holds.
Zooming in:

It’s not like d is now different. It’s the same distance, perpendicular to LOS, but just no longer vertical. The “true” vertical distance, perpendicular to the Earth surface is h = d / cos(α). One click in the mountains is taller than one click in the flatlands. For example, if α = 30º one click raises point of impact 15% more. You need to keep that in mind when correcting vertical miss (and divide clicks by cosine). Better yet do all math in MILs (or other angular units) rather than meters (or other length units). Another point to MIL/MIL scopes.
Last point here: all ballistic calculators I have seen so far measure bullet path in direction perpendicular to LOS, not in vertical direction.
1.3 What use is cosine
Let’s state from the onset: the knowledge of 1.2 and cosine values are totally useless for shooting strictly speaking. A mil stays a mil, uphill or flat angles are the same.
Yet, when estimating your distances with a stadiametric reticle (e.g. mil-dot), cosine can get really useful. Watch this example of shooting with a 30° downward inclination:

In this picture we see a “sniper’s dream”: a large object of known size — a 2 m high door occupies 3 mrad in the reticle. Distance to the target is therefore 1000 x 2 / 3 = 666.6[6] m, right?
Wrong. This estimation is not correct, as we see the door with a bias; under a 30° angle it takes less space in the reticle than if we saw it frontally. The real distance is therefore smaller — the result has to be multiplied by the cosine of the angle.
In the previous example, true distance is 667 x cos(30°) = 667 x 0.866 = 577 m — largely enough to make a difference between a hit and a miss.
Again, up to 10° all this science is useless. cos(10°) = 0.985; the typical practical error of reticle-based distance estimation is way larger than 1.5%.
1.4 Ballistic calculators
1. Use a good ballistic calc (JBM, AB, Stelok Pro, or of course my own little Plan 33, etc.)
2. Calculator has to support G7 model. G1 does not very well fit modern long-range bullets at speeds approaching the speed of sound (starting roughly at Mach 1.2).
3. Calculator should show different adjustments for angles of same magnitude but opposite signs (up vs. down).
4. Calculator should take into consideration air density change with altitude. Typically, the difference between, say 30° upward or downward shooting in supersonic should not exceed 1 or 2 clics. If the calc shows significantly more difference than that — chances are it fails to take into account the change of atmosphere along the trajectory (just calculates atmo once in the beginning).
(Pts. 3 and 4 are a reasonable indication that the solver correctly predicts trajectory with inclined line of sight.)
1.5 Subjective inclination
Hook an Angle Cosine Indicator (ACI) on your rifle, and get ready for surprises: perceived angles can be pretty far from reality.
Reality: 30º
Perception: really steep angle, “maybe 45 degrees”
Reality: 45º
Perception: “barrel points to the sky, approximately 60 degrees”
Reality: 60º
Perception: “nearly straight up”
Talking to more experienced mountain shooters provided confirmation: yep, that’s the way it is, especially hunters are known to brag about “a goat at 800 m 45º up”.
But play a bit with ACI (or even school protractor with a piece of string attached) and illusion quickly goes away.
Careful: small angles (up to 15°) can sometimes go unnoticed, unless you look for them.
1.6 Calibres and colours
In the following tables, cell colouring is based on military target sizes

| Green: | < ±10 cm = excellent (“head”). |
| Yellow: | < ±30 cm = good (“torso”). |
| Orange: | < ±50 cm = ok (“kneeling”). |
| Red: | < ±85 cm = fair (“full height”) |
| Black: | > ±85 cm = certain miss |
Disclaimer: the tables that follow reflect the perfect world, where aiming is perfect, dispersion of all guns is zero, and all distances are perfectly known. In the real world such perfection does not exist.
Calibres:
GP90 5.56×45 — bullet weight 4.1 g, calibre 5.56 mm, BC G7 0.166, V0 905 m/s, sight height 7 cm. (for our foreign friends — this is Swiss army ordnance issue of 5.56×45 NATO)
GP11 7.5×55 — bullet weight 174 gr, calibre 7.62 mm, BC G7 0.276, V0 780 m/s, sight height 4 cm. (for our foreign friends — the ballistics are very close to a very good .308)
.338 Lapua Magnum 8.6×70 — bullet weight 250 gr, calibre 8.61 мм, BC G7 0.322, V0 905 m/s, sight height 4 cm.
All zeroed at 100 m unless explicitly stated otherwise. Distances in meters, angles in degrees, drops and bullet paths in centimetres. All trajectories calculated in standard ICAO alt. 0 atmosphere.
Positive path values mean that bullet is above LOS.
Inclined Fire, part #2: When it doesn’t matter
As with any ballistic phenomenon, in practice the most important thing with inclined fire is to know when it is not important.
Case study: standard army issue Fass 90 assault rifle, 300 m battle zero. How does it behave when shooting at an angle?
The Swiss army manual responds with exactly one concise sentence: “when shooting at an angle beyond ±30º, aim low”. Not much for a mountainous country.
The table below shows nuances that the Swiss army manual glossed over. It contains drops in centimetres (the correct ones, already divided by cosine) for distances from 50 to 600 m and inclinations from -60 to +60 degrees.
Fass 90 + GP90, zero at 300 m

From practical standpoint,
1. If the angle is small (< ±30º), shoot as usual.
2. If the angle is large, starting from 100 m aim at the pelvis.
3. If the angle is very large (> ±50º), starting from 100 m aim at the knees.
Up to 400 m (realistic maximum engagement distance for iron sights or low power optics) these rules of thumb work fine. That’s probably what the army manual meant, but now we got the numbers behind the words.
Other assault rifles, e.g., АК74М, show very similar picture, and so does GP11 or .308.
Now let’s see when inclination does matter.
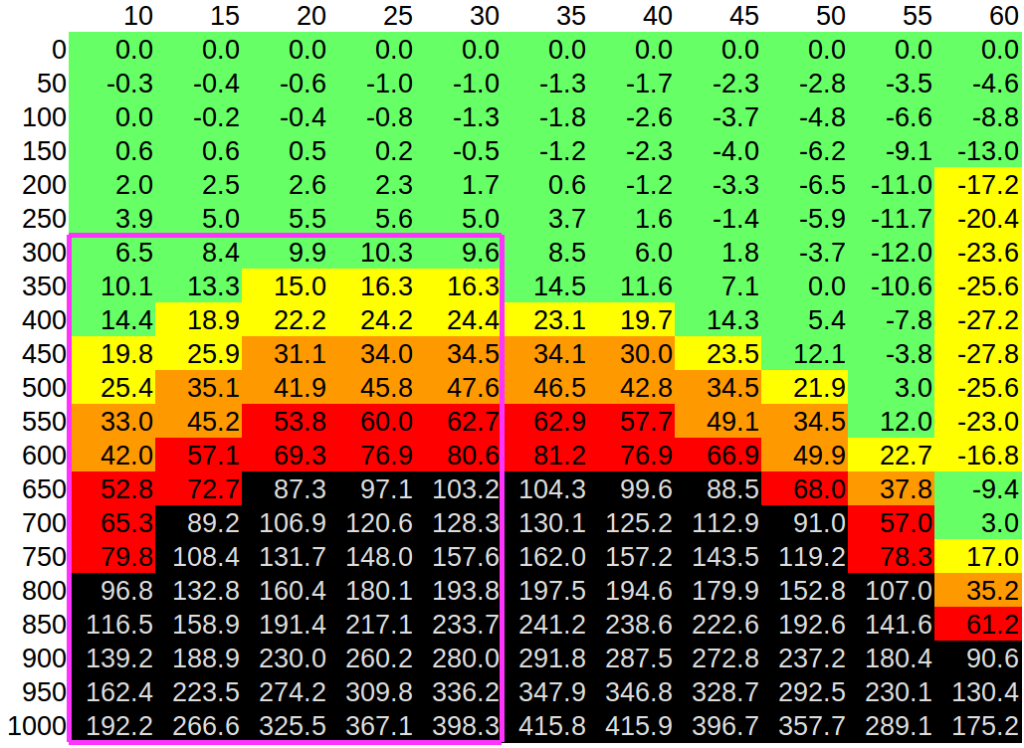
The table below shows what happens when slope is ignored, i.e. there is no correction for inclination. (Errors in cm, same color coding as above).
GP11 vertical miss distance, cm

Middle distances look abysmal for all but very mild inclination angles and appear to require ballistic calculator, precomputed tables, or at least some heuristic better than “aim low”.
The pink zone — beyond 300 m and below 30° — is most interesting: 30° is a lot, most of real-life shooting is much less steep than that. For angles < 30°, we are mostly ok up to 300 m without any adjustment. It is beyond 300 that things get delicate and interesting.
Inclined Fire, part #3: Options
There are several heuristics to help adjust our aim at inclined fire. The three most popular are Rifleman’s rule, improved rifleman’s rule, and Sierra’s:
http://www.exteriorballistics.com/ebexplained/article1.html
The fourth method is presented by NDS, and fifth is described later in this series.
Inclined Fire, part #3.1: NDS, or the fall of the favorite
I started with NDS method first because their other methodologies seem to be simple, straightforward, and highly applicable. I consider their sniper/DMR training and Perotti’s book on sniping top of the line.
In that book, “From 1 to 1,000”, inclined fire is covered by a couple of paragraphs that say approximately the following:
1. No correction within 160 MIL (≃9.1º).
2. For larger inclinations
2.1. Calculate difference in altitude between shooter and target, either using a map or by multiplying the distance by sine of inclination angle;
2.2. Divide by 3
2.3. Subtract this number from linear distance to the target, resulting in “equivalent horizontal distance” (EHD).
2.4. Take adjustments as if shooting horizontally at EHD.
Item 1 is clear. Item 2 can be rephrased as EHD = D – D * sin(α) / 3, where D is distance to target and α is absolute inclination.
JBM and LO-Calc gave surprising results (I did not believe it at first, had to check twice):
GP11 vertical miss distance, cm
Looks pretty much useless. Even simply fixing sights at 350 m works better.
Accuracy: bad
Domain: up to ≃400-500 m
Complexity: moderate — 1 table lookup, 2 mathematical operations
Pros: none
Cons: inelegant and useless
How this method made its way into otherwise excellent book is beyond my comprehension.
Looks like nobody’s perfect.
Inclined Fire, part #3.2: Rifleman’s rule
Moving on to the most popular empirical method – Rifleman’s rule.
The idea is very simple:

1. Measure inclination α;
2. Measure distance to target D (along line of sight);
3. Calculate equivalent horizontal distance De = D * cos(α);
4. Look up compensation as if shooting horizontally at distance De.
Rifleman’s rule has another nice property besides simplicity: it does not depend on the rifle, caliber, zero distance, etc. – just inclination and distance. This allows implementing it in universal laser rangefinders.
Sadly it is based on the assumption that bullet travels in vacuum (space marines, nota bene), and its use on Earth has significant limitation.
GP11 vertical miss distance, cm
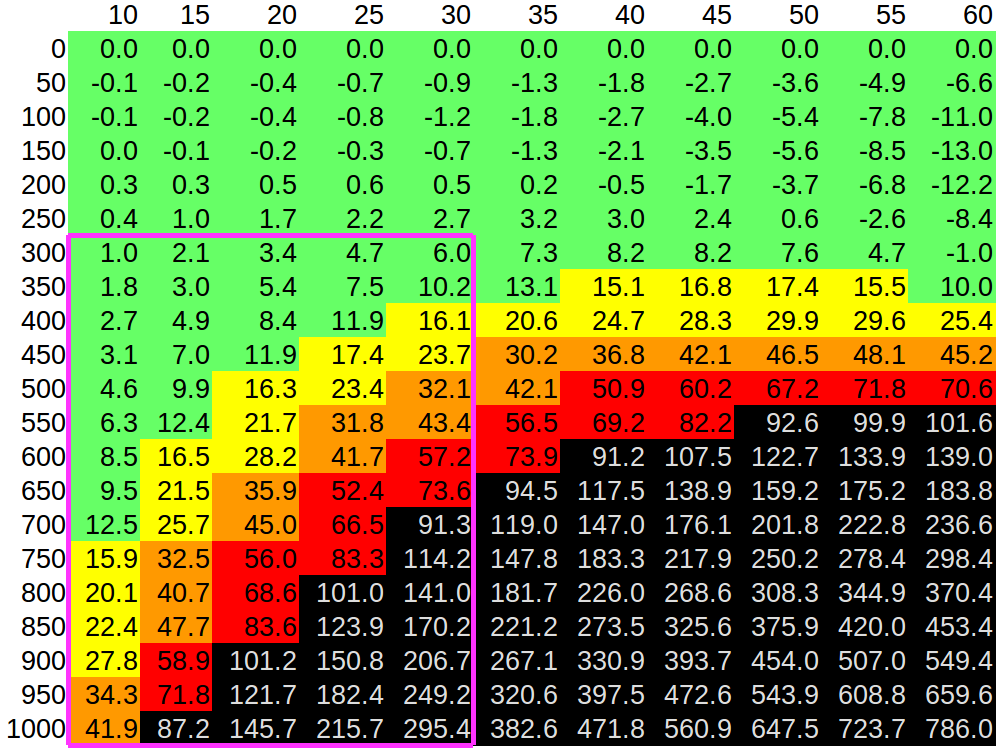
Bottom line: rifleman’s rule is better than nothing and better than NDS “method”. Yet 600 m at 30º is well in the red, explaining longevity of paper plate mentioned at the beginning of this article.
But why is everybody using rifleman’s rule then? The answer is mostly hidden just outside of the table. Rifleman’s rule works fine at distances shorter than 300 m, and is acceptable up to 400 m, which covers the majority of hunting applications. Army sniping relies on hunting skills, both historically (as the name implies) and currently (hunting experience is still a plus for an army sniper). But the table shows that what works for hunting in the mountains does not work well for game that shoots back, requiring you to keep the distance.
Rifleman’s rule consistently overestimates the effect of inclination for the three calibres that I looked at. After using this method, impacts are below the target. Predictability is good, one can come up with an empirical rule like “for inclinations above x degrees at y meters, aim at shoulder level”. Yet for reasons explained later in this article I decided not to bother.
Accuracy: acceptable
Domain: 30º, 500 m. Maybe a little more if holding a correction.
Complexity: very simple — 1 table lookup, 1 mathematical operation, often automated.
Pros: beautiful simplicity, independence from rifle and calibre, no need to amend or extend existing ballistic tables.
Cons: surprisingly limited applicability.
But not to despair, there’s hope. Read on.
Inclined Fire, part #3.3: Improved Rifleman’s Rule
The next step towards perfection is attributed to señor Tiro Fijo of Paraguay. It’s called “Improved Rifleman’s Rule”, the only difference being that correction is applied not to distance, but to correction. To wit,
1. Measure the inclination α;
2. Measure the slant distance (along LOS) D;
3. Look up bullet path (come-up) in ballistic table as if shooting at distance D
horizontally;
4. Multiply this correction (and not distance D) by cos(α).
And we get the following:
GP11 vertical miss distance, cm

Much better accuracy comes at a price:
1. No more rifle or calibre independence. Unlike Rifleman’s Rule, come-ups at any given distances depend on specific weapon system. Can’t implement such correction in a universal laser rangefinder.
2. Errors depend on zeroing distance. The further the zero, the more are the errors. (E.g. if rifle is zeroed at 300 and the target is also at 300, this trick is useless, as it gives zero adjustment and equals no slope dope at all.)
Example:
GP11 zeroed at 300 m vertical miss distance, cm
Not nearly as good.

Not nearly as good.
There are lower bounds on zero distance, both physical (sight height) and practical (existing range distance, pre-calculated tables with a given zero, etc.). Nevertheless this is the only method we tried so far that is acceptable beyond 500 m.
Just like its parent, Improved Rifleman’s Rule can be applied to existing ballistic tables.
It is also predictable, although in different direction: underestimates the effect of inclination. Bullet still goes higher, therefore battle zero logic remains useful.
Accuracy: good.
Domain: up to ±30º — all distances. Up to ±40º — within 800 m with additional hold.
Complexity: low — 1 table lookup, 1 mathematical operation.
Pros: reasonable accuracy, simplicity, can use existing tables.
Cons: dependence on zero distance.
Good, but can be even better. Read on.
Inclined Fire, part #3.4: Sierra’s
Now we proceed to the most accurate approximate method used by Sierra Bullets. Only proper ballistic calculator can do better.
But there’s no free lunch – we’ll need information not normally found in ballistic tables, namely vertical bullet drop at various distances. See the following picture for explanation.

As before, red line (LOS) goes straight from shooter’s eye to target. Green line is bore axis.

Blue arrow d is bullet path, perpendicular to LOS. Coyote brown arrow d’ is vertical drop. In absence of gravity, the bullet would continue along bore axis and drop would remain zero. On Earth drop is zero at the muzzle and negative throughout the rest of trajectory — that is, below the bore axis. Bullet path, on the other hand, can be either positive or negative (above or below the LOS).
To calculate drop table in JBM, set sight height to 0 and zero distance to 1 m.
Sierra’s correction is calculated as follows:
1. Measure inclination α;
2. Measure the slant distance (along LOS) D;
3. Look up in regular ballistic table bullet path d that corresponds to distance D;
4. Look up in drop table drop d’ that corresponds to distance D and flip its sign;
5. Sierra’s correction = d + (1 – cos(α)) * d’
Impressive results:
GP11 vertical miss distance, cm

Terrific, isn’t it?
Bottom line:
Accuracy: A+!
Domain: as far as the eye can see
Complexity: complex! 2 table lookups, 3 mathematical operations
Pros: accuracy is as good as it gets
Cons: too complex to be useful, requires extra data (regular ballistic tables are not enough)
Shooting rules of thumb should work under stress. Sierra method is too complex to be of much use in such scenario. Even setting aside practicality of two sets of tables, the chance of getting the calculation wrong or not fast enough is too high.
So none of the methods so far is acceptable. It does not appear possible to have your cake and eat it, too. Yet there is light at the end of the tunnel. Read on.
Inclined Fire, part #3.5: Even Better Rifleman’s Rule
Here it comes.
EBRR? (or Increasingly Improved Rifleman’s Rule = IIRR? 2I2R = two-eye-two-arr?)
When analysing errors of Improved Rifleman’s Rule (which appeared the most promising), I noticed that they are more or less (well enough for a heuristic method) linear in distance, at least for angles beyond ±20º.
GP11 Improved Rifleman’s Rule errors, 0.1 mrad clicks
| 15 | 20 | 25 | 30 | 35 | 40 | 45 | 50 | 55 | 60 | |
| 300 | 0.36 | 0.62 | 0.99 | 1.44 | 1.95 | 2.55 | 3.19 | 3.94 | 4.71 | 8.16 |
| 400 | 0.35 | 0.64 | 1.01 | 1.46 | 1.98 | 2.60 | 3.28 | 4.01 | 4.80 | 8.28 |
| 500 | 0.31 | 0.59 | 0.96 | 1.42 | 1.95 | 2.57 | 3.25 | 4.02 | 4.83 | 8.46 |
| 600 | 0.27 | 0.54 | 0.90 | 1.36 | 1.88 | 2.50 | 3.20 | 3.98 | 4.80 | 8.54 |
| 700 | 0.21 | 0.48 | 0.82 | 1.26 | 1.79 | 2.42 | 3.12 | 3.88 | 4.74 | 8.58 |
| 800 | 0.14 | 0.38 | 0.72 | 1.14 | 1.67 | 2.28 | 2.99 | 3.78 | 4.63 | 8.61 |
| 900 | 0.06 | 0.26 | 0.58 | 1.00 | 1.50 | 2.11 | 2.82 | 3.61 | 4.48 | 8.65 |
| 1000 | -0.07 | 0.11 | 0.39 | 0.79 | 1.29 | 1.88 | 2.59 | 3.38 | 4.27 | 8.66 |
| 0.20 | 0.45 | 0.80 | 1.23 | 1.75 | 2.36 | 3.05 | 3.82 | 4.66 | 8.49 | |
| -15 | -20 | -25 | -30 | -35 | -40 | -45 | -50 | -55 | -60 | |
| 300 | 0.39 | 0.68 | 1.09 | 1.51 | 2.05 | 2.62 | 3.29 | 4.01 | 4.77 | 8.07 |
| 400 | 0.45 | 0.77 | 1.16 | 1.61 | 2.15 | 2.77 | 3.45 | 4.18 | 4.95 | 8.32 |
| 500 | 0.49 | 0.81 | 1.22 | 1.70 | 2.25 | 2.89 | 3.57 | 4.30 | 5.11 | 8.50 |
| 600 | 0.52 | 0.88 | 1.30 | 1.79 | 2.35 | 2.98 | 3.68 | 4.43 | 5.24 | 8.63 |
| 700 | 0.59 | 0.95 | 1.38 | 1.90 | 2.48 | 3.12 | 3.82 | 4.57 | 5.37 | 8.74 |
| 800 | 0.67 | 1.05 | 1.51 | 2.04 | 2.62 | 3.28 | 3.98 | 4.74 | 5.53 | 8.84 |
| 900 | 0.76 | 1.16 | 1.65 | 2.20 | 2.80 | 3.46 | 4.17 | 4.92 | 5.70 | 8.92 |
| 1000 | 0.87 | 1.31 | 1.82 | 2.40 | 3.02 | 3.68 | 4.40 | 5.14 | 5.92 | 9.05 |
| 0.59 | 0.95 | 1.39 | 1.89 | 2.47 | 3.10 | 3.80 | 4.54 | 5.32 | 8.63 |
The takeaway is that at a given angle errors are approximately proportional to distance, therefore correction in clicks will depend only on the inclination. This is good news.
Now how they depend on the inclination — that is the question. Let’s take average correction in clicks for a given angle (green cells at the bottom), and get a robot to draw us a nice picture.

Jackpot!
The straight line is linear regression. (For the nerdy types, like me — I know it is not linear strictly speaking, but it is linear enough for a heuristic method). In regression formula above, slope is saying “1 click per each 10 degrees”, while intercept is saying “starting from 20 degrees”. Residuals remain within ± half a click.
The algorithm is simple (this, my friend, is the actual EBRR (or was it 2I2R?)):
1. Calculate correction as per Improved Rifleman’s Rule;
2. Subtract from the result 1 click per each 10 degrees above 10:
20º minus 1 click
30º minus 2 clicks
40º minus 3 clicks
etc.
GP11 2I2R (or was it EBRR?) vertical miss distance, cm

Hooray, comrades. The lawn looks sufficiently green and no longer undermines property value.
Let’s check elsewhere.
GP90 errors, clicks
(A reminder to our foreign friends, GP90 is the standard Swiss military issue of 5.56×45mm NATO.)

GP90 Even Better Rifleman’s Rule vertical miss distance, cm
I’m sure you always wanted to shoot Fass 90 at 1,000 m and 50 degree inclination.
Now you can do it with a 0.029 cm accuracy.
.338 Lapua Magnum errors, clicks

.338 LM Even Better Rifleman’s Rule vertical miss distance, cm

.338 is already convincing enough on flatlands. In the mountains, combined with 2I2R, this is downright WMD and total nuke from the orbit.
Let’s recap: we found a simple heuristic that can use existing ballistic tables and has excellent accuracy with various calibres.
Yet it has two limitations:
1. Only works with 100 m zero;
2. Only works with 0.1 mrad clicks.
Well, it works with MOA or other clicks, just not as simple to remember (for example, 300 m zero calls for 0.1 MILs per 5 degrees over 10).
Full algorithm:
1. Measure the inclination α;
2. Measure the slant distance (along LOS) D;
3. Look up bullet path (come-up) in ballistic table as if shooting at distance D horizontally;
4. Multiply this correction (and not distance D) by cos(α).
5. Subtract one click per each ten degrees of inclination over ten, i.e., 20º -1 click, 30º -2 clicks, 40º -3 clicks, etc.
6. Profit!
Accuracy: A;
Domain: all practical angles, distances, and calibres.
Complexity: low — 1 table lookup, 1.5 mathematical operations.
Pros: accuracy, simplicity.
Cons: only works with 100 m zero and 0.1 MIL clicks
Inclined Fire, part #3.5bis: 2I2R for victims of MOA
And now folks, a special edition of the 2I2R for unfortunate owners of scopes with clicks graduated in ¼MOA. (Many of my good friends fell victims of this perversion; US manufacturers of [otherwise excellent] scopes seem to love this.)
Improved Rifleman’s rule:
1. Measure the inclination α;
2. Measure the slant distance (along LOS) D;
3. Look up bullet path (come-up) in ballistic table as if shooting at distance D horizontally;
4. Multiply this correction by cos(α).
The secret ingredient, 2I2R-MOA:
5. Subtract one click per each five degrees of inclination over twenty, i.e., 25º -1 click, 30º -2 clicks, 35º -3 clicks, etc.
Is it not terrific?
Inclined Fire, part #4: 2I2R in practice (prototyping)
Now that we have mastered the arcane science of the world’s best heuristic method to estimate slope dope, how would we live with this knowledge in real life? Even the best method is pointless without an action plan.
Let’s start with border conditions, where heuristics still make sense. The logic is simple:
1. An electronic calculator is required for any operation beyond addition or subtraction of two-digit numbers;
2. If a calculator is required anyway, we might just as well take a ballistic calculator, and sneer at heuristics, paper tables, etc.
3. Heuristics and paper tables are, therefore, really needed only in a situation when electronics fail. Not because of HEMP (God forbid us being nearby), just due to dead batteries/cracked screen/water damage, etc.
The first approach was dumb and straightforward — a cosine table for integers:

(Underscore indicates that shown digits of cosine remain the same for the next (odd) value of the angle.)
Fold (9×16 cm), laminate, poke a hole, attach a string, there we go. The max error does not exceed 1 click, which is ok, but:
1. The table takes a lot of space (could only fit up to 40 degrees)
2. An additional mathematical operation (addition) is needed beyond 50 clicks = an excellent opportunity to fail.
1+2=wrong enough.
Then a wise friend of mine has pointed me to a mildot master (which at first I dismissed, for MOA terminology and Rifleman’s Rule, both lame). A logarithmic scale is the answer.
Meet the 2I2Ror

PDF to print on A4: 0.1 mrad, ¼ MOA.
Print, cut out the window, laminate, cut into three parts (left to right) face, insert, back. Glue (or staple) face to back via 1 cm wide spacers at the edges so that insert can slide in and out without binding and too much slop. Idea was shamelessly borrowed from here: http://ada.ru/guns/ballistic/mildot/master/manufacturing.htm They also have Ikea-style assembly pictures.
Use the 2I2Ror

Look up bullet path (come-up) in ballistic table as if shooting horizontally, align it with 0º mark in the window. In this example come-up is 54 clicks, which corresponds to 600 m on my rifle. Now 30º mark is next to approximately 47 clicks. Green scale to the left of degrees shows additional correction. For 30º angle it’s minus 2 clicks.
47 – 2 = 45
That’s it, feuer frei!
(Sanity check: actual correction is 45.2 clicks; the paper plate is definitely dead).
For the nerdy types, correction scale spacing is proportional to log2, angle scale spacing is proportional to log2(1/cos). Two as the base for the logarithm is chosen at random (it was simpler to write vector-generating scripts, with the cos(60º) as a reference); an other base is just scaling (multiply by a constant).
That’s all there is for the first prototype. Feel free to improve or suggest improvements.