In the shooting world, the process of mounting a rifle scope is surrounded by an esoteric halo that to me is absolutely inexplicable. Some gunsmiths do not hesitate to charge obscene sums of money for a procedure that essentially lasts 15 minutes, and they multiply and spread legends with the motto “it’s very, very complicated”. On this subject, myths, some more harmful than others, are spread on the Internet, in all the languages I can understand, and next to that, there is no shortage of examples of expensive optics killed to death by overzealous mounters.
Comrades, don’t believe everything you are told, but believe me: it’s really very simple.
Choice of a scope mount
Let’s start with the most important: the mount is chosen for a specific weapon-scope combination. There is no such thing as a “universal” mount.
There are two types of mounts: individual rings, which are attached individually to the rail, or single-piece, where the same rings are milled together on a rigid platform, which is in turn attached to the rail.
All else being equal, a single-piece:
- Is more rigid, which is always a good thing.
- Can be made with integrated inclination, which is very useful, especially on flat (0 MOA) rails. Caution: In these cases the mount has a clear direction (usually a “direction of the barrel” arrow). Pay attention to this, so as not to accidentally mount it in reverse, otherwise the inclination will be in the wrong direction.
- Can be cantilevered, which is sometimes necessary to mount the scope at the optimum distance from the eye (see below), when the length of the Picatinny rail is insufficient (i.e. place the ring where the Picatinny is no longer present).


Rings, in comparison:
- Are, on average, slightly lighter.
- Can be made lower (height of the optical axis above the rail) than a single-piece.

If you are looking for an über-low mounting (which is, in principle, useful, there is less of a swing effect), or when every gram counts, opt for rings. Otherwise, go for single-piece. I prefer single-piece, but also use rings for some specific configurations.
Aluminium alloy or steel – it doesn’t matter.
The “quick detach” feature (hand levers instead of screws) only(!) makes sense when you really need it, e.g. in the middle of an epic battle against a bloodthirsty horde of Infernal Teletubbies, quickly remove the damaged or dirty optics, so you can immediately continue to mow down the filthy beasts with the metal sight. In all other cases (when there are no backup metal sights, or when you can find a minute to unscrew two screws), prefer the classic mounting, without “quick detach”, it is much simpler and more reliable.
Vertical clamp rings (where there are left and right halves of the rings) are to be avoided completely, as a class. They can cause serious problems that are very difficult to diagnose (e.g. the parallax adjustment all of a sudden goes weird on you). The Way of Wisdom is “ring = upper half + lower half”. That said, Spuhr rings/mounts with a 45° clamp also work very well.
When choosing the mount for a particular rifle-scope combination, dear reader, adopt a comfortable shooting position and ask a comrade to hold the sight over the rail. This is to:
a) Determine the correct and comfortable mounting height (cheek is indexed to the stock cheek rest, without undue pressure). This factor can be compensated to some extent by a height-adjustable cheek rest.
You should also take the opportunity to ensure that with the chosen mounting height the objective (with caps) passes over the barrel, that the eyepiece passes over the receiver, and that all zoom levers and adjustment turrets do not interfere with the comfortable travel of the charging handle and other manoeuvres.
but also
b) See if the length of the rail is sufficient for the rings to be in the right place, or would an offset mount be required.
Factor (b) is not complicated either. Every rifle scope has an optimum eye relief — the distance between the eyepiece lens and the eye. For traditional rifle scopes (not “scouts”), this distance is usually between 8 and 10 cm. At about this distance, the image occupies all the space inside the tube. If you move your eye further away, or closer, shadows start to appear at the edges of the image. Ideally, the scope should be placed at the ideal distance – halfway between the points where shadows start to appear as you move closer or further away. It should also be noted that a comfortable head position when shooting standing or sitting is further back than when shooting prone. If there is an intention to shoot upright, proud warriors that we all are, it would make sense to check the distance to the eyepiece in this position as well.
However, when selecting a mount, there is no need to dwell on this too much; the point at this stage is simply to know if an offset mount is required.
Finally, make sure that the mount you choose has sufficient space for the central block of the scope (the one with the windage and elevation adjustment turrets). On some larger models, this block hangs 6-7mm below the tube – it should not touch the rail or the base of the mount. This is worth particular attention in the case of relatively low single-piece mounts.
The procedure
Step 1: Fit the scope loosely into the rings, so that it does not turn on its own, but you can still move the scope inside without effort.
Step 2: Place it on the Picatinny and, by moving the whole thing in the rail slots and the scope inside the rings, set the optimum distance to the pupil so that no shadows appear around the image in all intended firing positions.
Before you start, set the scope to maximum magnification, as this is where the eye relief is usually the most fickle. During the process, it is useful to check the distance found by zooming in and out (depending on the optical system, the distance to the pupil may vary with the change in magnification).
The rings should not touch the parts of the tube where it widens. Ideally, they should be 5 mm or more from the centre block, the eyepiece part and the widening of the objective part.
If separate rings are used, and there is room for manoeuvre, the clamps can be moved further apart – this minimises the lever of recoil force acting on the scope. Just in case: except for very light instruments, the scope should be mounted on two rings (not one), placed on different sides of the central block.
When the correct distance to the pupil is found, the mount or the rings are to be pushed as far forward as possible inside the Picatinny slots they occupy, and screwed to hold in place – hand-tightening with two fingers, without forcing, just to prevent them from moving (we will come back to the final tightening later). Indeed, Picatinny slots are made with a certain tolerance. If the assembly, let’s assume, is at the rear of the slot, when a shot is fired, the rifle sharply recoils backwards, and, as a result, the whole scope mount assembly will start to slide forward in its slot. At some point, of course, it settles and stabilises, but on the way forward there can be unpleasant surprises with accuracy and zero.
Step 3: Align the scope horizontally. Good news: plumb bobs and spirit levels are not necessary. All you need is a rigid metal bar with parallel sides, such as the bearing part of a calliper or a steel ruler.
Figure 1: The scope is not aligned in the mount.

Figure 2: The metal ruler bar with parallel sides is inserted between the scope’s adjustments box and the mount.
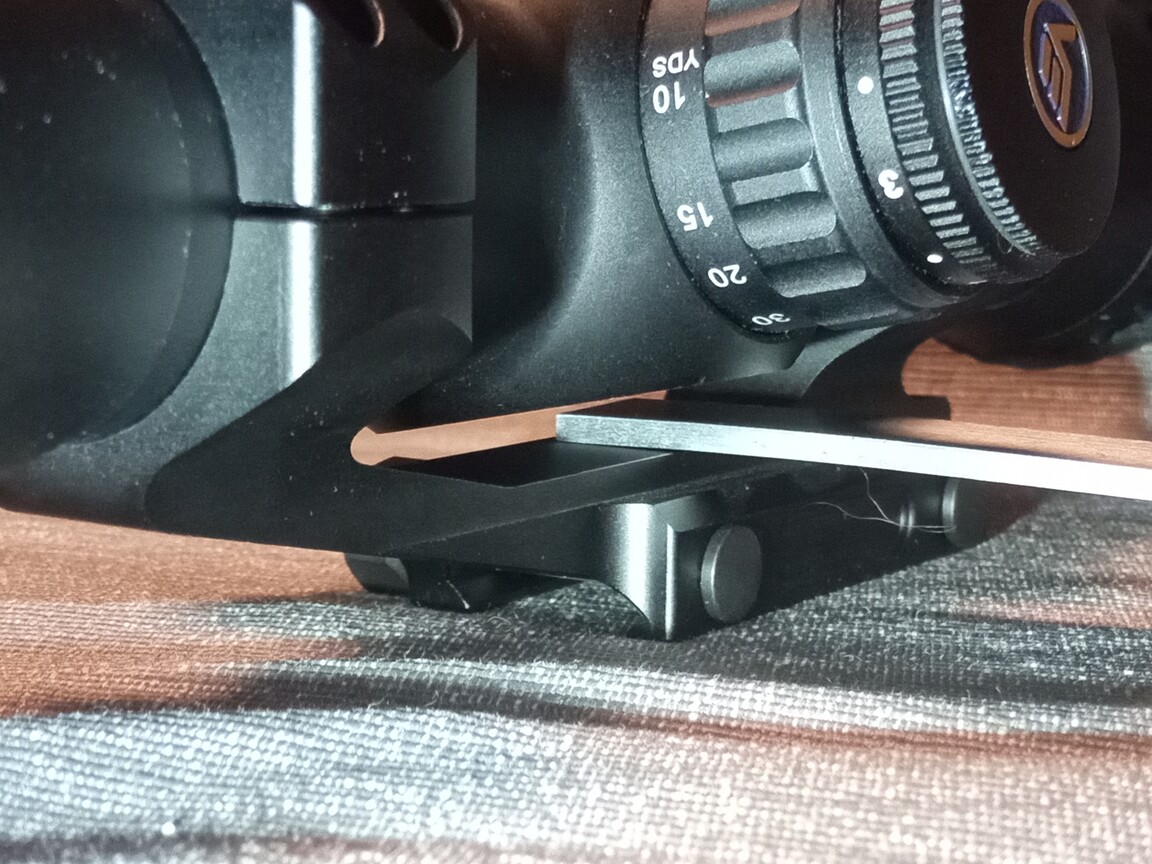
Figure 3: The ruler is placed obliquely between the bottom of the scope adjustment housing and the top of the mount/rail. The scope is turned to make the two surfaces parallel (eliminate the gap between the ruler and the parts being aligned).

That is all. This method, full of Beauty, Truth, but above all simplicity and efficiency, comes from an Era-Tac manual. If the rail is mounted straight on the rifle (the upper surface of the Picatinny is well in line with the receiver), it gives exactly the same results as the traditional shamanism with spirit levels. If the rail is mounted with a small tilt (which sometimes happens to the best of them), this method gives in practice less(!) error (horizontal parallax between the barrel axis and the optics axis) than bubbles and strings.
Once horizontal, the scope is lightly fixed in the rings with the screws. The objective is to avoid any accidental rotation. The key word is “lightly”. The force of two fingers on a thin screwdriver is more than sufficient.
Step 4: Tighten the scope in the rings.
IMPORTANT: When mounting a scope, the key is not to overtighten the rings. Too many people tighten the screws as much as they can. This mistake is the most common cause of serious and difficult-to-diagnose problems (inability to focus, fickle zoom, etc.), which in extreme cases can be downright fatal to the scope. Read the instructions – in most cases the scope manufacturers give the maximum recommended torque, usually in the range 1.7-2.0 Nm. For those who happen to come across the instructions written in the archaic Liberian system of weights and measures, 1 Nm = 8.85 in*lbf.
Personally, I take 1.8 Nm as the standard “default” value.
WARNING: Unless explicitly stated by the manufacturer in the instructions, do not exceed 2 Nm!
CAUTION: 2 Newton-metres to the touch may not seem like a lot, and you may be tempted to give it one more tug “just to be sure” – don’t give in to the temptation. A torque screwdriver is highly recommended!
Tighten all the screws gradually in an X pattern, to keep the gap between the top and bottom of the rings on both sides roughly the same (to the eye).
Step 5: Fix the mount in the rail.
The advice is the same: don’t try to overpower the metal. With particularly zealous fitters, I’ve seen threads ripped off, aluminium alloy broken and steel bent more than once. Stronger does not mean more reliable.
5-6 Nm is quite enough for a perfect hold.
Assorted final remarks
Any sort of “honing” or “final machining” of the rings at best does not improve anything, and in most cases is downright harmful. If the mount is screwed (which, apart from airsoft products made of depleted merdonium alloy, is increasingly rare), throw it away and buy a proper one. Coaxiality can be checked by placing a steel ruler on the lower halves of the rings (in the case of separate rings – mounted on a rail). No visible space = alignment ok.
A threadlocker is only necessary for fully automatic rifles or large calibre rifles (magnums of all kinds). In these cases, a little blue Loctite (or similar) is enough to allow disassembly without heating. And again, this is usually over-assurance. Before applying the threadlocker, the screws should be degreased with alcohol. For me the “big bore” starts at .338 LM. For “normal” calibres (up to 30-06, 8 Mauser, etc.) threadlocker is unnecessary (but does not harm either).
ACHTUNG: all kinds of epoxy glues or “strong” Loctites (those that require heating for disassembly) are pure evil (both on the screws and in all other places), and are always a deep, varied and inexhaustible source of drama.
If you mount a scope on an über-magnum or an automatic weapon, you can lightly dust the inside of the rings with fine rosin powder – it has an extremely high coefficient of friction, and ensures a perfect hold, even with elephant calibres. Rosin can be bought cheaply, for example, in music shops (in the “stringed instruments” section, near the violins and cellos), and can be easily removed with alcohol if necessary. With less invigorating calibres (up to and including 8 mm Mauser), rosin is unnecessary.